After sharing my page yesterday on my working process I had a few inquiries from fellow editors about the software I use to dissect developmental edit a novel.
The software in question is yWriter. It was written by Simon Haynes (Spacejock) who, in addition to designing software, is also an author. Designed as a tool to help writers, I have found it a useful device for note taking during the developmental stage of editing.
I have little awareness of how other editors work, but to quickly summarise how I work, I always read the manuscript in its entirety before doing any detailed analysis of story, technique or structure, and follow this with a one-two week ‘rest period’.
Ywriter
Ywriter is primarily a writing tool and is especially useful for writers who like to plan their novels to the last full stop. For this post, I will discuss the sections generally or this will turn into a novel length post.
I have made a sample so I can show you how I use it for developmental editing (please excuse the shoddiness of this potential novel):
As you can see, the end result of using this software is that you can see at a glance the scene details and the characters, locations, and items that are important to the scene/book. Story time can be tracked, a storyboard (by character pov) accessed, dramatic arcs (line) charted, reports printed. It’s really a case of having a play with it and looking at how (and if) it can work for you.
How I use it
Rather than use it as intended, I set up each project in such a way that it will suit my purposes. I only edit science fiction and fantasy and would say that 90% of my clients are writing serial works. As such, I don’t use the chapters and scenes as intended.
To use yWriter, you would first create a new project (project/new project wizard), after which you create your first chapter (chapter/create new chapter) and then create your first scene (scene/create new scene – after first clicking on the chapter you created which now shows in the left-hand column). If you were writing your novel, you would add new chapters and scenes as you progressed.
What I do is this:
I name what should be ‘chapter one’ – ‘book one’ – and each of the ‘scenes’ on the right-hand side is actually a chapter of the book. Now, this is fine for single pov
Now, this is fine for single pov books, and even a good omniscient, but if an author is prone to splitting scenes every other page (especially to pov switch) this system isn’t really going to work (i.e you would better using it in its intended purpose, with chapters on the left and scenes on the right).
The reason I work this way is so I only need to enter the character, location, and item information once, and can also track themes from book one through to book one hundred and ten in the project notes section. This avoids the need to check back to previously published works to check what colour eyes Bob had in book two (he’s a minor-ish character, after all). You could even use it to track style consistency. If the author spells the word ‘starship’ as one word in book one, and you’re working on book three and it’s suddenly ‘star-ship’ or ‘star ship’, then you’re going to catch that straight away (simply by checking the word list you’ve created in the project notes section).
(And I hope I don’t sound condescending, I don’t know what you know, or how you work or even what tools you use to maintain consistency within books, but do hear authors mentioning how they had to hunt through book three to check if Bob wore a ring on his second or third finger – and yes, that information could be crucial to the entire series).
So, in my mind, the basic premise is to have all the books in one project file with notes I can add to as each manuscript lands in my inbox, but without the need redo all the character, location, item, and project notes. I can quite literally just pick up where I left off.
The developmental edit
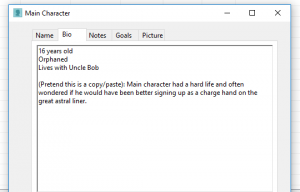
While on my second read, I make notes of characters, locations and items I feel will be important throughout the book(s) and so add this information to the relevant area in yWriter (usually as a quick copy and paste as this makes it trackable if I need to find it later on to check a discrepancy).
There are four key areas in yWriter I use:
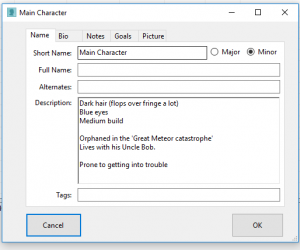
Here is an example of a character:
So, as you read and add your notes, you are building up a portfolio of each character. I think note-taking like this actually helps to reinforce the information, as opposed to just reading and forgetting minor (but important) points. Later on, you may find the author is presenting the character in a way that doesn’t feel right. Perhaps they’ve been presented as a shy, introvert, yet in chapter thirty-six they’d out partying and encouraging everyone to do the Conga (without a good explanation as to why there is such a change in the character’s personality).
Building a portfolio in this way will also help those editors who write editorial letters/assessments (I assume). I don’t do this myself as I find it hard to put my thoughts together in a summary, although this is an area I am working hard on improving.
The same technique is used for locations and items.
As I’m reading, as facts are presented by the author, I’m either adding to the picture being built or checking information (and writing suggestions/notes to the author in the document as I go). My best catch to date (and I hope the author won’t lynch me for revealing this) was a character who lost a limb, only for it to have healed perfectly three chapters on. I wasn’t using yWriter at that time, and I believe I would have caught it earlier if I had. It took me three reads to clock onto the fact the limb had appeared (which I’m rather embarrassed about, although it is better for me to have caught it – eventually – than a sharp-eyed reader.
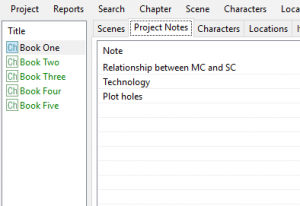
For elements that don’t quite fit into those boxes, I use project notes:
With project notes, you can add your own title/element to follow and simply add notes to it as you go, but as I said earlier, you could have the author’s style guide in here to quickly check spelling or word choices.
And that is really how I use yWriter. Obsessive (at times) note taking and checking of details and facts, building up a portfolio of characters, locations, and items.
(I will write more posts on this subject and go into detail on them, this is really just meant as an overall picture of how I use it). I’m also conscious that editors will be reading this and apologise for any errant grammar. I am not a copy editor, though I have written this to the best of my ability. Feel free to point any typos out, I won’t take offence.


Very useful post. Thanks Michelle for detailed description of how this software works.